Showing posts with label interior design. Show all posts

Wednesday, February 1, 2012

1.) My View Today

I wish this was more picturesque, but that is why this is a challenge right?
So here it is! My View Today! Bahaha! But this is the honest truth.  Most of my day has been at my desk working hard on a hotel design project.  We are beginning the drafting phase, which means a lot of:
-Pandora listening
-Hand cramping (which is why I have Silly Putty, lower right, to work any kinks out)
-List making
-Eye Crossing
Wish me luck!
another designer's view today, jealous!
I will also be seeing my wonderful students today, but thought that would be creepy to take a photo of them all!  Let's see what tomorrow brings friends!
XO
C

Thursday, January 12, 2012

Pinning Accomplishments (Part 3)

 Last night was my first class as a college instructor at my Alma Mater, UK's College of Design.  I was sooooo nervous, and I bet the kids could tell.  I don't know why I was nervous, I mean, I am the teacher right?  Any how, I really did like it and all the students were wonderful.  I hope to continue teaching part-time if I end up really enjoying it!

I wanted to show more accomplishments that I've achieved thanks to the wonderful Pinterest.  More focused on the DIY/craft/decor side of things.
corny.
I love that the simplest ideas are usually just about the most darling.  These candy corn candle displays were just perfect for the Halloween season and so of course, I imitated this for our Halloween party.  I already owned the clear glass containers, then visited the dollar store to snag some candy corn (which surprisingly was more delicious than the name brand).  
subtle.
not so subtle.
My first thought for this pin of white canvas and 3D letters was, What a great wedding gift!  And I still believe that it is.  However, I wanted to use the idea in a not so romantic format. 

Sometimes in the morning for me it is difficult to skip out the door all "honky-dorey" (not sure about the spelling there!?!), but when I look at my mantra on the wall it makes me laugh and helps me skip on outta there.  I found all the items at Hobby Lobby, canvas, letters, white acrylic paint, and white spray paint.  I first painted all the letters I needed then hot glued them to the canvas.  Then spray painted the canvas and glued letters with spray paint so all was glossy and consistent.  I like how it turned out and would like to make more.
clever.
In my kitchen I mounted an espresso floating shelf above our breakfast area and place three mismatched white plates (well two match, but anyways...) on them.  I wanted to write a cute message on the plates, but was so unsure as to what I wanted to write with my handy Sharpie Paint Pen (awesome by the by). Then I checked out Pinterest to see what I could find, because "Eat/Pray/Love" had just been done one time too many.  I'm a quirky person so I wanted something food related, funny, cute.  I found this farmer's market poster on a wall and just loved it at once.  See my version below.
kitchen humor.
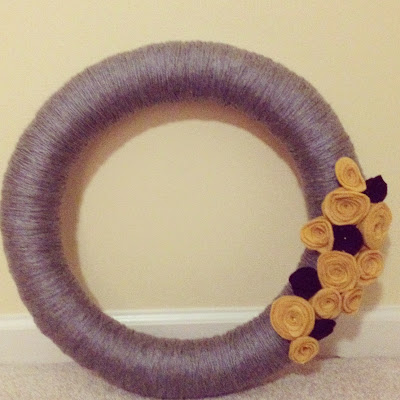
I have seen these yarn wrapped wreaths on Pinterest many-a-times.  Craftspeople will sell them on Etsy as well, if you prefer not to make them yourself.  The pin below I believe is an Etsy available product.  However, I wanted to give it a whirl myself.
lovely.
I picked up a round straw wreath from Hobby Lobby.  Selected my yarn for the wreath body and picked out some felt for the flowers.  I actually kept the plastic around the wreath that comes on it.  Since I was not sticking anything in the straw or gluing directly to the body of the wreath I just let it on for overall aesthetic consistency.  I wrapped the wreath twice with yarn (one large unit of yarn worked fine), but it is tedious.  I put in a DVD and cozied up with my yarn wrapping to help pass the time.  Then I looked up felt yarn tutorials via Pinterest and used a combination of all that I read.  I actually did not glue the flowers to the wreath, I just used pins.  I wanted to be able to switch them out depending on the season.  I selected these colors for fall, but for spring I have bright green and purple flowers and summer are warm and bright colors.  I really loved the way it turned out and how well it greets guests and I get so many good responses when people realize that I made it!  In fact, I'm going to make some for friends at their requests.
More to come! Have a fabulous day!

Tuesday, January 10, 2012

School Eve

Tomorrow is my first day of school, as a teacher! I am super excited about this new adventure.  Although I don't think the students are as excited as I am.  I know when I was a student I wish more alumni were around to support us and advise us.  So now this is my chance to give back! I'll let you know how my first day goes.

Our Hudson is almost one year!  I cannot believe it, but we excited to see him grow!
My boy only eats organic natural.
To top it off, it is a full moon so all the crazies are out and my moods are unpredictable.
From our deck.
Hey Big Spendah!
My latest Essie color added to the family, called Big Spender.  Hoping it will brighten up a dark winter wardrobe and pathetic winter season we have had thus far here.

Thursday, December 29, 2011

Pinning Accomplishments (Part 1)

Who doesn't love Pinterest? People that haven't discovered it yet, I say.  All joking aside, it is quite difficult to focus on just one thing on Pinterest.  So many wonderful images, craft ideas, fashion inspirations, dream home wants and beauty tips.  And I always wonder if I will ever really accomplish or try any of the things that I pin.  So I am going to take a look at some accomplishments that I have achieved thanks to this wonderful virtual pin board.

Today I am going to focus on the recent holiday season and how Pinterest helped me:
Inspiration Photo: Link here.
Placing a toilet paper roll in the center of vase displays to help the ornaments display better.
Oh, stunning.
In my case, I actually used a white candle.  I liked the option of being able to light it up with my other candles on my mantlepiece. This picture makes it look like the candle is leaning.  This would be a fire hazard.  I assure you, no fires took place here.
Inspiration Photo: Link here.
I loved this mantle display.  My main Christmas colors in my home are green and silver as well.  This year I didn't have the pine branches, but what a nice textural touch.  See my attempt below.
Feeling festive yet?
My silver candelabras were relocated to decorate above the kitchen cabinets. I have talked about mantel decorating in a past post and my troubles in deciding what I want as my permanent focal point.  This all takes time and I will be patient until I find the perfect layout and items.
Inspiration Photo: Link here
This wreath was one of my earliest pins.  I fell in love with it when I first saw it.  Here is my recreation and new interpretation of it:
I added our last name initial to the bottom and my wreath has square edges rather than round. Mine is also larger and this took a while to make.  I had to individually glue each piece on! It took about three days to make, but I am very please with the end result.

TGIF! Happy Weekend!

Friday, December 9, 2011

Just Call Me Professor

I cannot, cannot believe that I haven't posted in this long amount of time! For this, please forgive me.  Time has just slipped away this holiday season!  Thanksgiving was a busy weekend for us, considering we still have to go to both my husband's and my family's house to eat (but I don't complain about the whole eating thing).  It was wonderful to be surrounded by family that loves us all under one roof counting our blessings.  

Hudson, our pup, has happily turned 10 months old and is still going through some teenage growing pains, defying us at every possible turn.  But we find ourselves excitedly planning on what we are going to buy him for Christmas!  Ah, having fur babies is always an adventure
Thoughtful pose.
Sure, he looks sweet now.
Last weekend I attended a retirement celebration for one of my favorite college professors, Terry Rothgeb.  He traveled with a group of us in school to Germany and he was a blast to travel with.  He was a wonderful educator, mentor and friend.  I can't imagine my school without him.  But, I am very happy for him and hope he has a wonderful retirement (he told me about his future travelings to Palm Springs, Munich, Berlin, just to name a few).  
 The title of this post is referring to a new adventure for me starting in January.  I have accepted a part-time teaching position at University of Kentucky's College of Design and am looking forward to it so much. My class will be only two nights a week for two hours each class, so this way it won't interfere with my full-time position.  I can't wait to give back to my school that I am so proud of.  I am also excited to teach the students about the "real world", and what it is really like to practice interior design day-to-day.  The Lord has blessed me with this opportunity and thanks to a wonderful friend's recommendation of me, I finally get to educate!  Wish me luck!

And another update, I have been working on a new hotel/restaurant project that has taken up every waking minute of my work week!  Very exciting new project though and very blessed to have it.  I have been waiting 5 years to work on a hotel and the opportunity has finally arrived.  Hooray!

Hopefully this weekend the hubby will be painting our kitchen and living room.  It was one of my hot items on my Christmas list.  And tomorrow night is our family's annual family dinner at Sal's (an absolutely fantastic restaurant here in Lexington).  My husband'sHere comes the weekend!

Wednesday, November 16, 2011

A Thanksgiving for Interior Designers Only

West Elm.
An entire Thanksgiving feast with all the trimmings, but to attend you must be a graduate of UK's Interior Design School Class of 2007!  This tradition has been going on for about 7 years now and we sometimes can't believe it.  Back in design school (second year) a few of the girls decided to have their own Thanksgiving and invite all the designers over to feast!  I actually did not attend the first dinner, for whatever reason I can't remember now, I think I was out of town.  But I made up for it with my participation third year of school, and the "Interior Design Thanksgiving" Tradition stuck.  We actually cook a turkey and by "we" I mean not me!  HA!  And each person brings a side or dessert. And we dig in! 

This Saturday evening will be our 7th year doing this.  The only difference now is that most of us are married (only one of us has a kid), we have paying jobs, we own property, get more sleep, improved our cooking talents and a lot of people have to travel now to our dinner.  Our class is now spread across the country: Lexington, KY to Yuma, AZ to New York, NY to Cincinnati, OH to St. Louis, MO!  Now not everyone travels THAT far to come and I can't blame them, although it is quite an event in our circle!  Even our favorite professor joins us, who is finally retiring this year after 40 years at the school. 

I hope this tradition can continue as long as possible, I know as time goes on schedules will get busier, people will have children and phone calls will be less frequent.  But for now we are staying strong and it's pretty impressive.  Traditions can weigh on people sometimes (I can think of some crazy family traditions that sometimes I'm just not in the mood for), but when it comes down to it they're something that you can depend and brings comfort to the soul.  I was going to include some pictures of our dinners, but there are NONE! I can't believe this.  We better start a new tradition this year of taking pictures, we are usually way to busy catching up, talking and laughing! Ah, good times.

Monday, November 14, 2011

Mis-Mantled

I love fireplaces and mantles in homes.  They create wonderful areas of warmth and focus for the home.  It's fun to decorate for many seasons and occasions. I am lucky enough to have a mantle in my own home, but I am not satisfied with how I have decorated it.  Our ceilings are 14', so I feel everything looks teeny on my mantle with all that height up above.  What is a poor little interior designer to do???

My goal is to find something large in scale that would work, but there in lies another struggle: mirror vs. store bought art vs. I paint vs. photography, etc.  Another problem, I would like the mantle display to be adaptable for seasons and holidays, like a place to hang a wreath/garland.  I also do not want to spend a lot of money in my attempts at decorating this important focal point of my living room (and also kitchen).  So, I looked to Pinterest for help.  Here are some of my pins that sparked some ideas!

Lots of photos.
Good mix of tradition and rustic.
Piece of art to center inspiration.
Large mirror resembles window pane.
Mixes of texture and media.
I like everything about this.
Like the round mirror w/ letter.
Large framed photo w/ greenery.
I like both the idea of having a large mirror with smaller photos, plants and candles surrounding.  But I also love the idea of using the mantle to make an artistic statement, but I just can't find a piece that the husband and I both can agree on.  I'll need to definitely think further on this.  And also this past weekend the husband and I thought of placing the television above the mantle to give us some more breathing room where we sit.  Decisions, decisions.  I'm keeping my eyes open though for any piece or beautiful mirror that just seems like "the one".  It sure is fun to look at decorating ideas on Pinterest, helps any cases of the Mondays!

Monday, June 6, 2011

Me and My Shadow

One of my projects accomplished from this past week off was to create silhouettes of me and my family.  I had already owned some unused framed and matted artwork that desperately needed to be replaced.  I used vinyl wallcovering samples for backgrounds to add texture and depth to the silhouettes and basic charcoal paper for the cut-outs.  Overall this homemade art project cost me under $7, not too shabby.  So, if you would like to create your own the steps are easy and you'll love the end result.

First step is painfully obvious, take profile pictures of your subjects.  If you are doing multiple silhouettes like me, you should stand at the same distance for all the profiles so when printed the heads are scaled appropriately.  After you are satisfied with the pictures taken, print to the size you wish the silhouettes to be.  Cover the pictures with tracing paper and using a pen draw over the profile (see picture below).  This may take a rough draft or two, I kept messing up around the nose for some reason.  Small details like hair and eyelashes are very important and add a great amount of character to these.
My husband was a great sport.
 Then staple the perimeter of the trace to the silhouette paper of your choice so that it is secure.  To cut use either scissors or an exacto knife (I preferred an exacto knife, but I have a lot of experience cutting strange angles with these).  And after this step you have your actual silhouette.  Now you can display it however you choose: whether you mount the silhouette on a brightly patterned cardstock or attach it to classic white that is your decision.  I covered the pictures with black paper that I currently had surrounded by white matting and then covered that with textured white wallcovering (leaving a black border) and finally attached my silhouette before inserting it into the frame.  See below for final picture.
Voila.
However, I did not put all three in one frame.  Far too busy, each person gets there own (I guess I'm not one for sharing, OCD "Only Child Syndrome").  I was extremely pleased with the final result.  Happy Monday!

Thursday, May 26, 2011

Staycation 2011

The time has come to relax.....at home! Usually vacation to me involves traveling somewhere new or familiar, either way it is AWAY! But this year I have decided to take time off for the sake of taking time off.  As an interior designer one of the top comments one gets is, "I bet your home is gorgeous!"  Well no it usually is not because we spend so much time making sure everyone else's spaces are beautiful.  By the time we get to our homes we are tired and as long as laundry, dishes and home is clean then I am satisfied.  But lately the nesting newlywed in me has been stirring and I've had enough! I want my home to be special too!  So, a list of DIY'ing is in my very near future and I am getting very excited.  Here are some sneak peeks at some of my projects:
Silhouettes

Framing Fabric & Wallcovering

Mantel Art Piece

Window Treatment for Family Room

Food Themed Collage or Artwork for Kitchen


Here's to hoping I can accomplish all this while spending lots of time cooking, cleaning, working on my tan and of course time with my two men (hubby & hudson).  I will document all of my craftiness while on staycation.  Have a great kick-off to summer everyone!


Thursday, May 19, 2011

Triple D

No I am not referring to someone's chest size.  This is my acronym for the Designer vs. Decorator Debate.  I am here to educate the public, as are my fellow designers.  I am a graduate of University of Kentucky's College of Design: School of Interior Design.  This consisted of a four year program, endless studio hours and lots of craziness.  For a person to call themselves an Interior Designer, they must achieve a college degree first.  Most collegiate programs in this matter focus on the commercial design world (hotels, corporate offices, hospitals, etc.).  As designers we are taught fire codes, public handicapped accessibility and commercial finish attributes in order to create beautiful and functional spaces for all.  
Following the wonderful achievement of graduation: one hopes to either start their career with a design firm or continue on with getting their masters.  I chose to go down that career path and once a designer has worked in the field for a minimum of two years they are then eligible to take the NCIDQ (National Council for Interior Design Qualification).  I will not bore you with details, but this test is for real HARD! It is a two-day, 16 hour exam that causes many a sleepless night for us young designers.  Once this is achieved, we are assigned an official designer number and can legitimately design across the country.  This exam tests our knowledge, problem solving skills and  health.  This job really is more than picking out paint colors and fabrics (although that is one small part of our job). And don't ask us, most of us do not watch HGTV all the time. HaHa.

An interior decorator can be absolutely anyone.  Whether you are an actual interior designer, a former psychologist or a carnival employee.  These are individuals usually who have the innate talent in the decor department.  This is a talent that I do not fully possess.  I can decorate/design my house how I prefer, but as far as helping someone else....Nope.  Home decor is far too personal for me, everyone has their own tastes.  A decorator needs to no degree, accreditation or knowledge of building/fire codes.

So I will come down off of my soap box and hope you found this egg of knowledge useful and interesting.  If not, sorry but I cannot give you the three minutes it took you to read this back.
Busy at my office.